Introduction
This sections contain a selection of 10 simple projects that you can run from the Examples section in the Projects tab of GraspIO Studio.
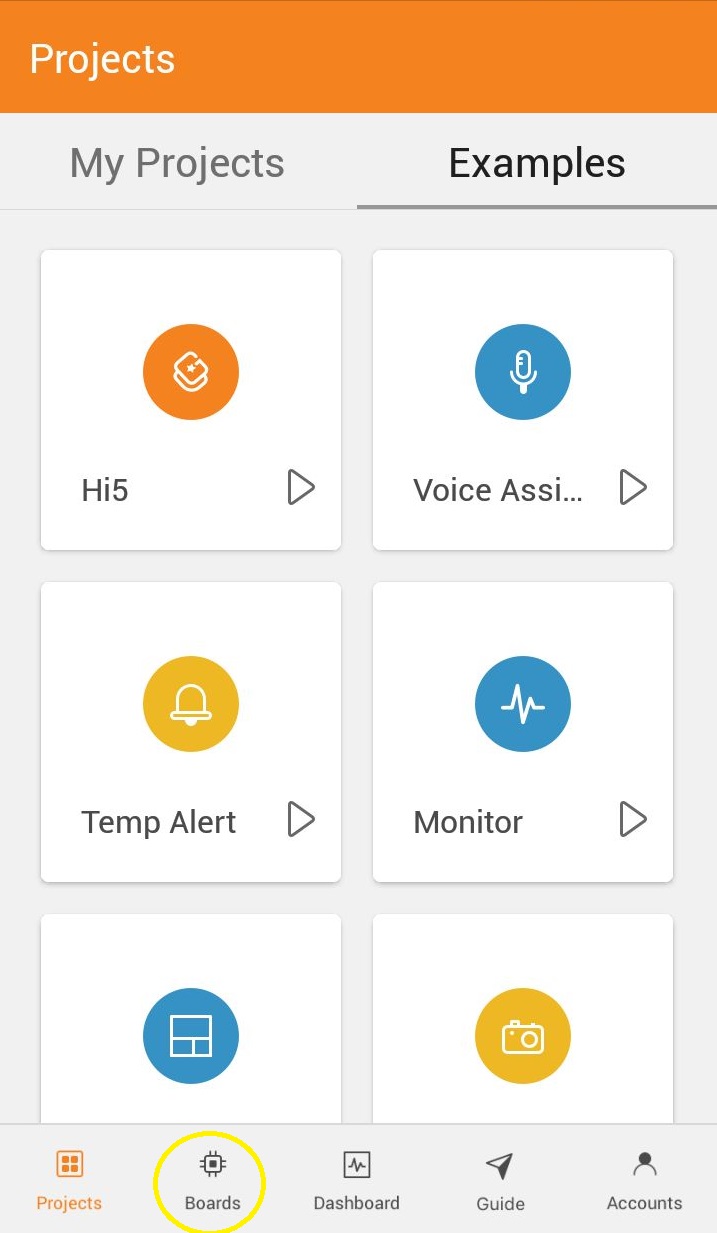
You can read the About section of each project to understand the working of the project.
The Design considerations section will offer you some usage-related guidelines that will help you design and develop your own projects easily.
1. Hi5
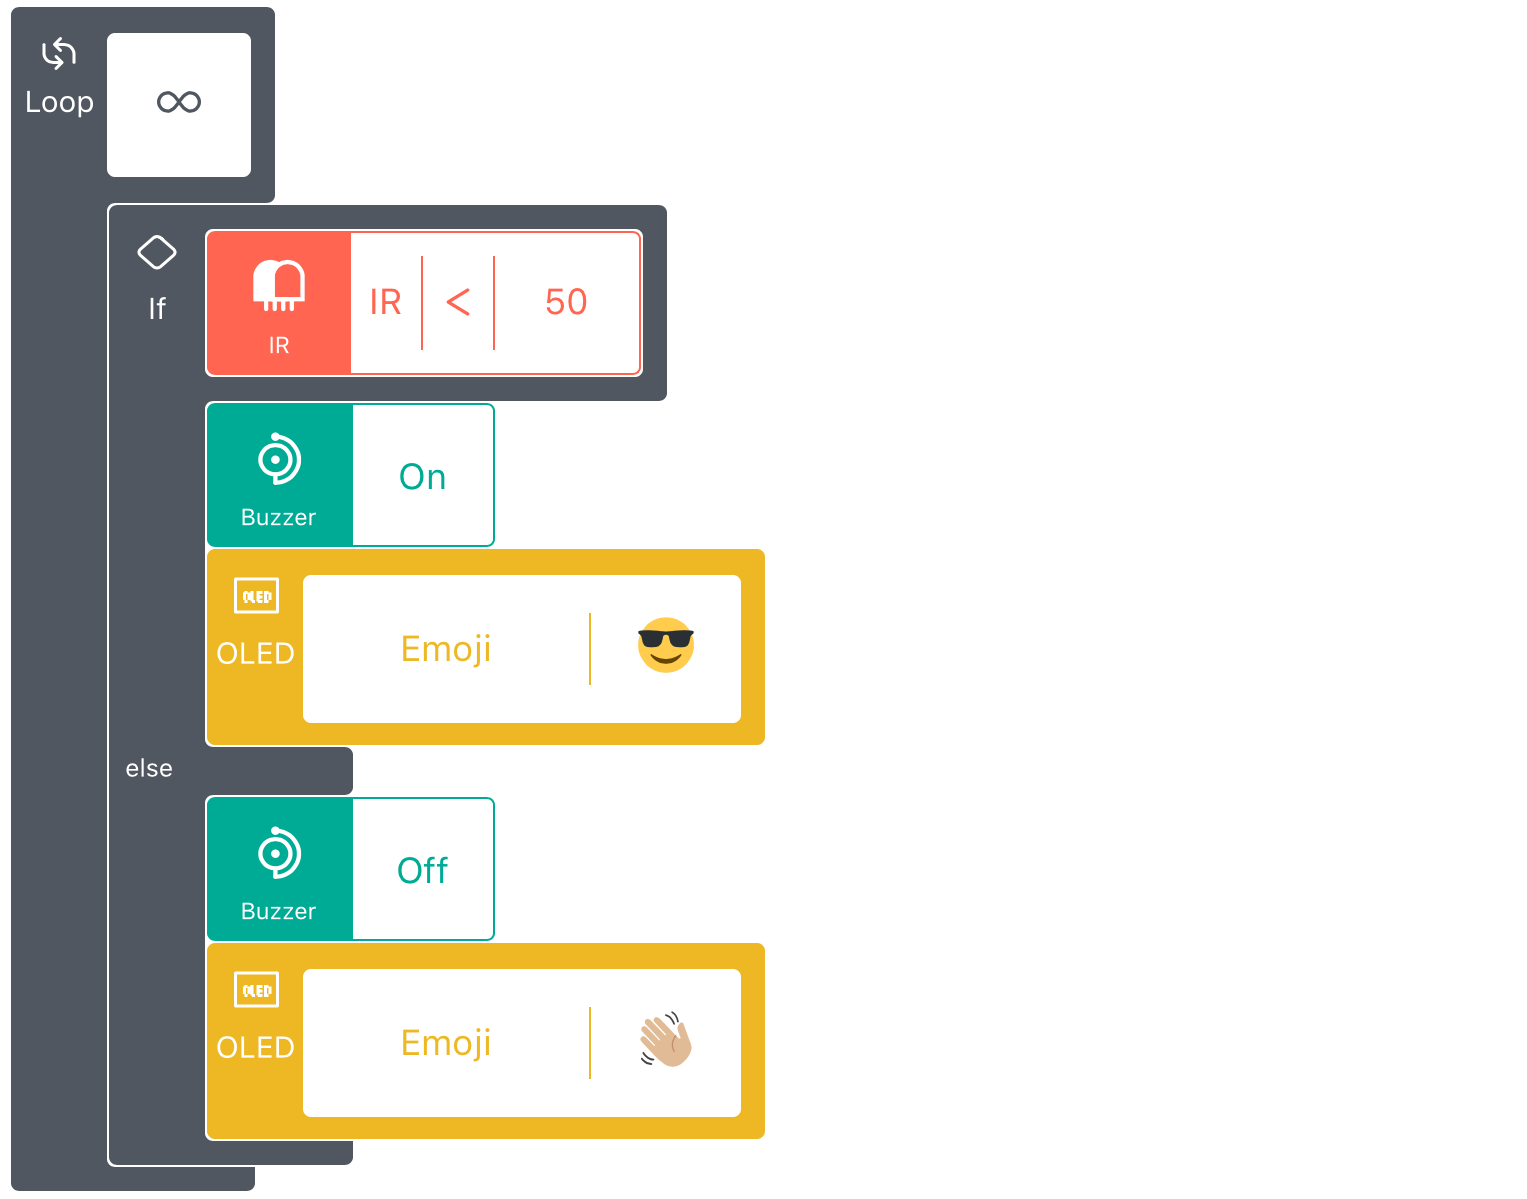
This project displays a High-Five emoji on Cloudio's OLED when you move your hand (or any object) near the on-board IR sensor. The buzzer starts beeping when the project is uploaded and does so, till your hand is close to the IR sensor. It displays a smiling emoji when the IR sensor value is low, i.e, when your hand is at a distance from the board.
Hardware used
On-board:
Buzzer
OLED
Design and implementation
Design considerations
- Since this project needs to run from the time it is uploaded to the board till the board is turned off, or overwritten by another project, a Loop block with the ∞ parameter is used.
- The IR sensor is used to detect proximity.
- The Else functionality of the If block is enabled in order to design the project for different behavior for the True and False cases.
- The Read functionality of the Input blocks can be used to set the threshold values for the condition being checked in the If block.
Running this project
- To run this project, upload this project to the board. You'll hear the buzzer go on when the project is uploaded.
- Move your hands towards and away from the IR sensor (marked IR on the board)
- Observe the OLED screen for the emojis displayed for each case
2.Voice Assistant
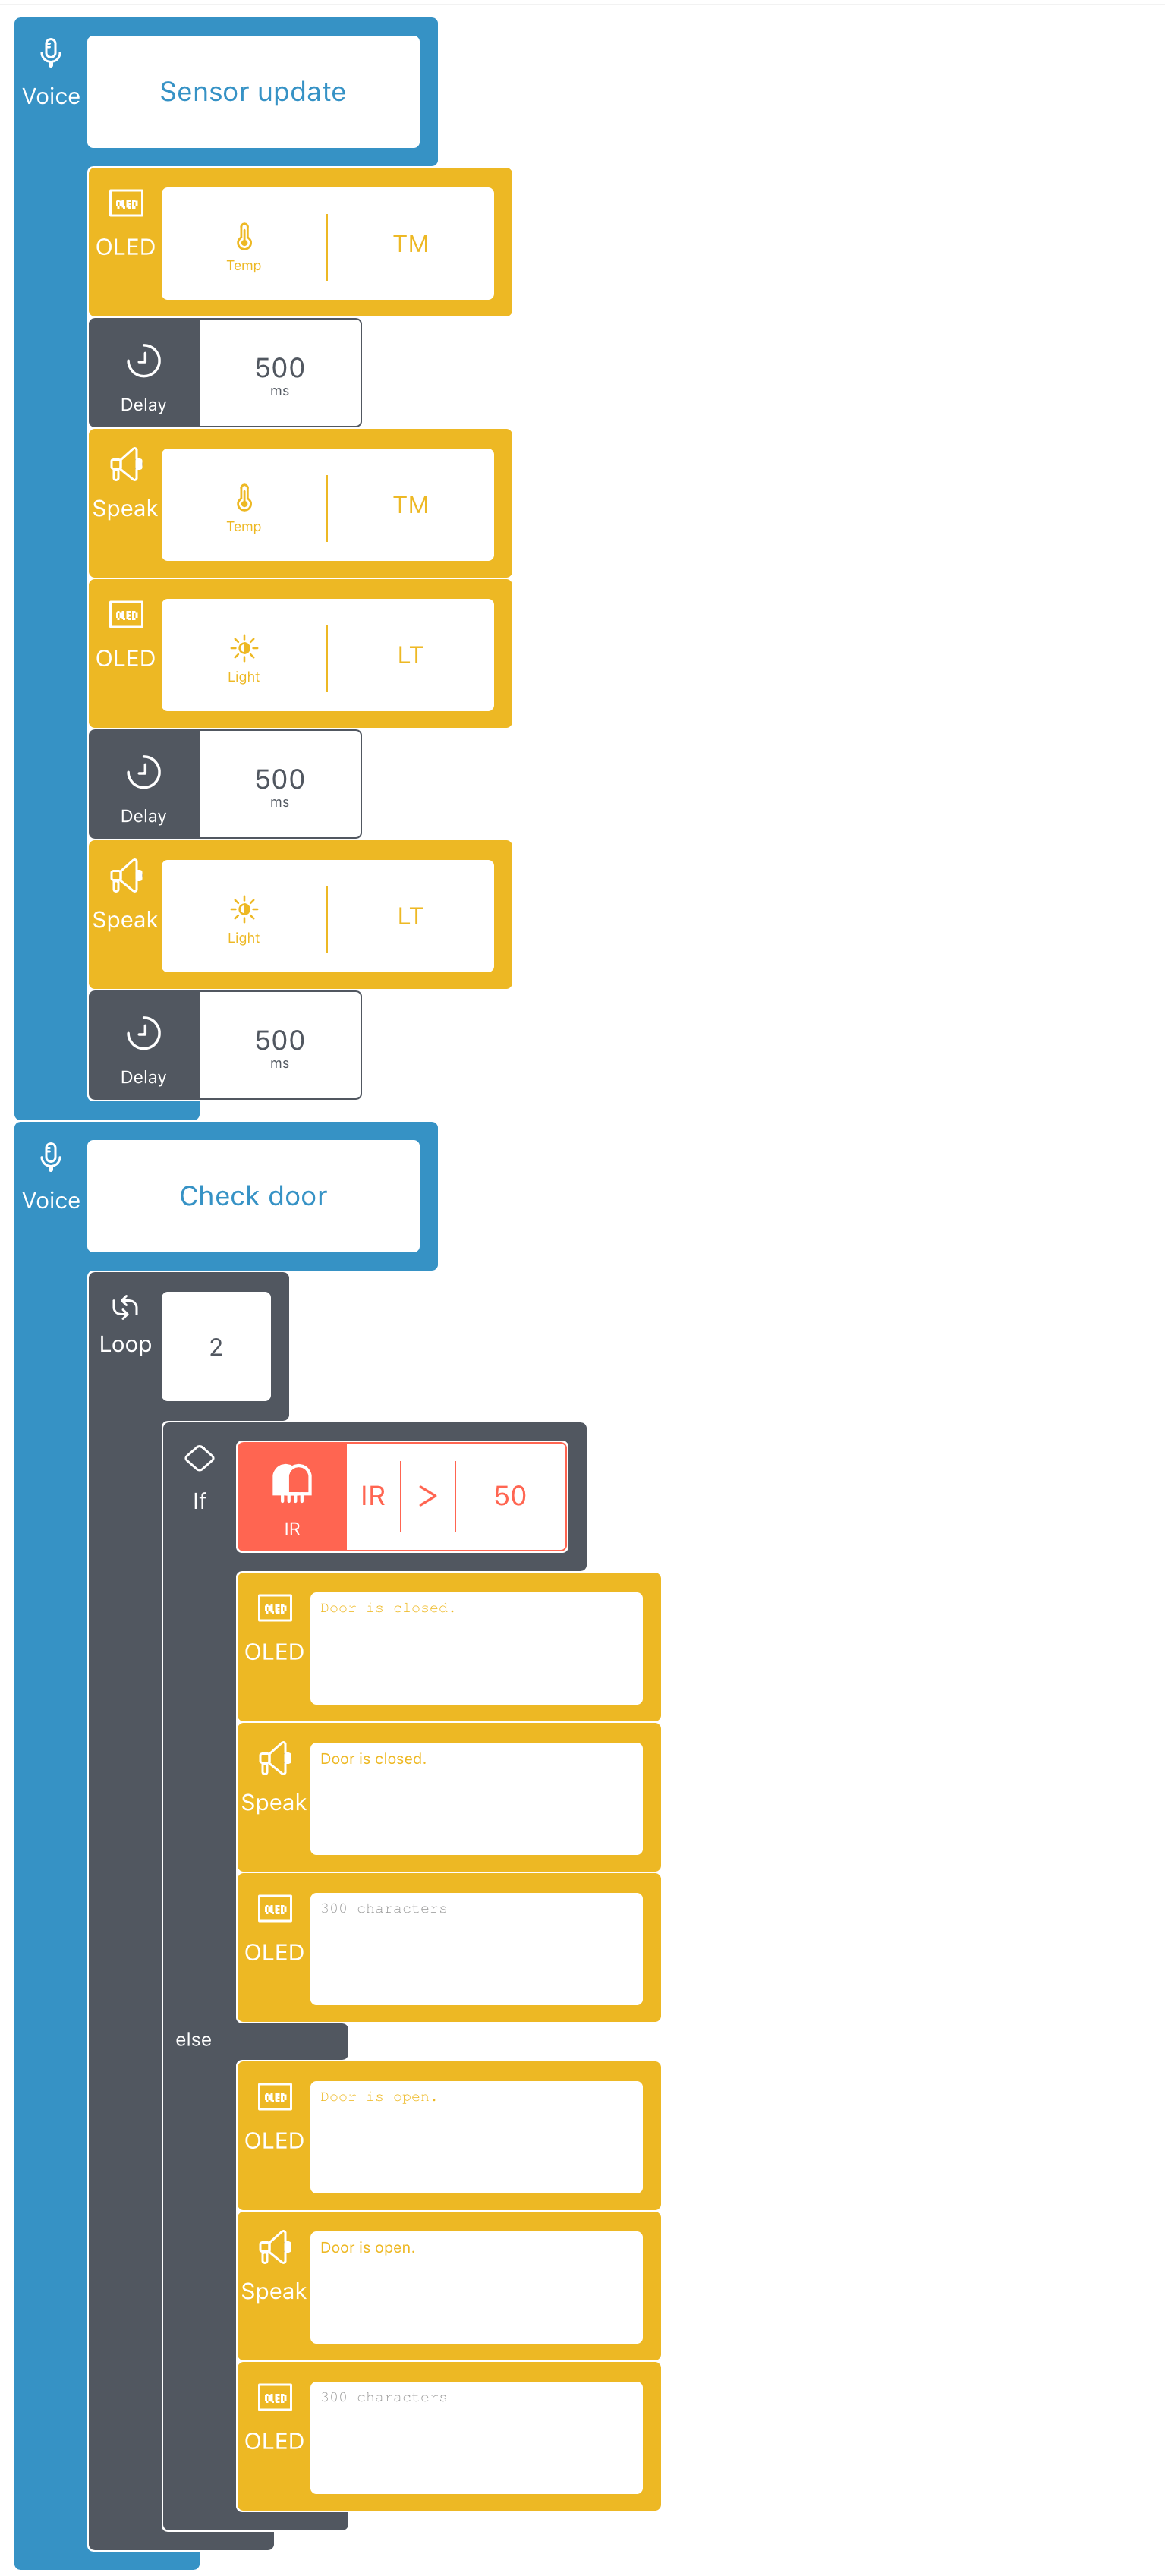
This project creates a remote voice assistant on your mobile device which you can use to get the current temperature and light values from Cloudio. You can also fetch the status of a door status detector that has been set up using the Cloudio board (if the board is placed such that the door being closed increases the IR sensor reading, and vice versa).
This block uses the Speak and OLED blocks to provide audio and visual notifications on Cloudio.
Hardware used
On-board
IR sensor
Temperature sensor
OLED screen
External
Speaker (Connected to Raspberry Pi's audio jack)
Design and implementation
Design considerations
- Since door status is to be checked at the time the voice command is given, the looping parameter used in the Loop block is set to 2.
- (You can modify this as per your design needs)
- The Delay blocks and Speak blocks are used between the 2 consecutive OLED blocks so that the change in data displayed on the OLED is discernible.
- An OLED block with blank text is used at the end to clear the OLED screen.
Running this project.
Upload the project to your board.
On your mobile device, in the Voice scree, press and hold the Microphone icon to give a Voice command from either of the options - Sensor update OR Check door.
In response to the Sensor update voice command, the speaker connected to the Cloudio-Raspberry Pi setup would play/speak the Temperature and Light sensor values. The OLED also displays the Temperature and Light sensor values with a delay between the two.
3. Temp alert
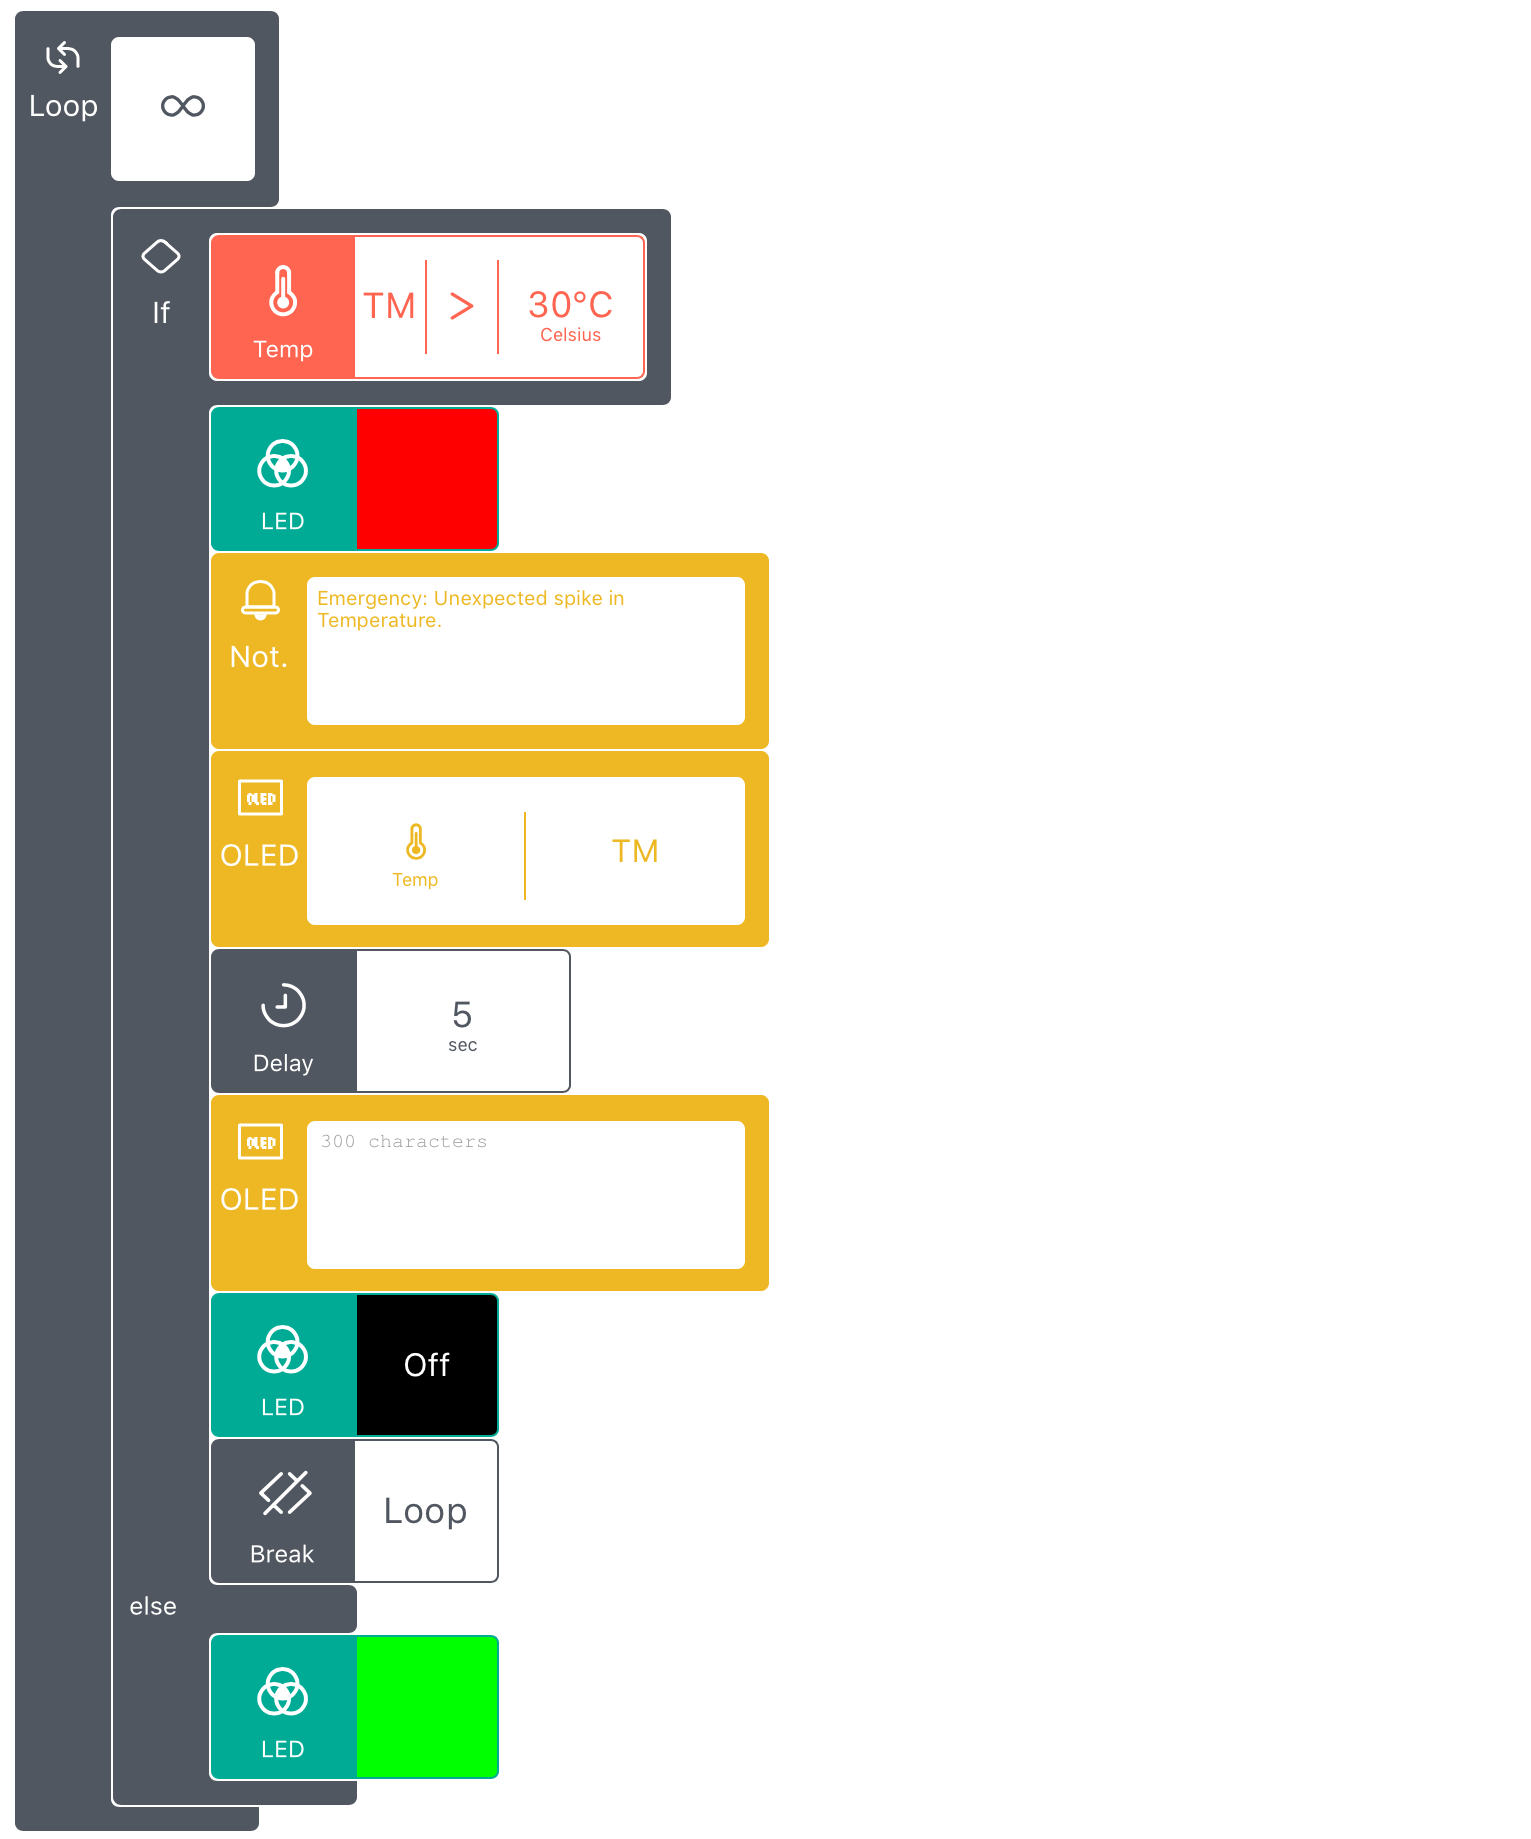
This project notifies you when there is a change in temperature. It uses the Notification block so you can receive remote notifications on your mobile device.
The LED is green in case of stable temperature and turns red and the OLED displays a warning message when the threshold temperature is breached.
Hardware used
On-board
Temperature sensor
Design and implementation
Design considerations
- Since the project needs to continuously monitor the value of the sensor, and not just at the time of upload, a Loop (block with infinite repetitions is used at the start of the project.
- A Break block is used to exit the monitoring of the Temperature sensor once the threshold is crossed.
4. Monitor
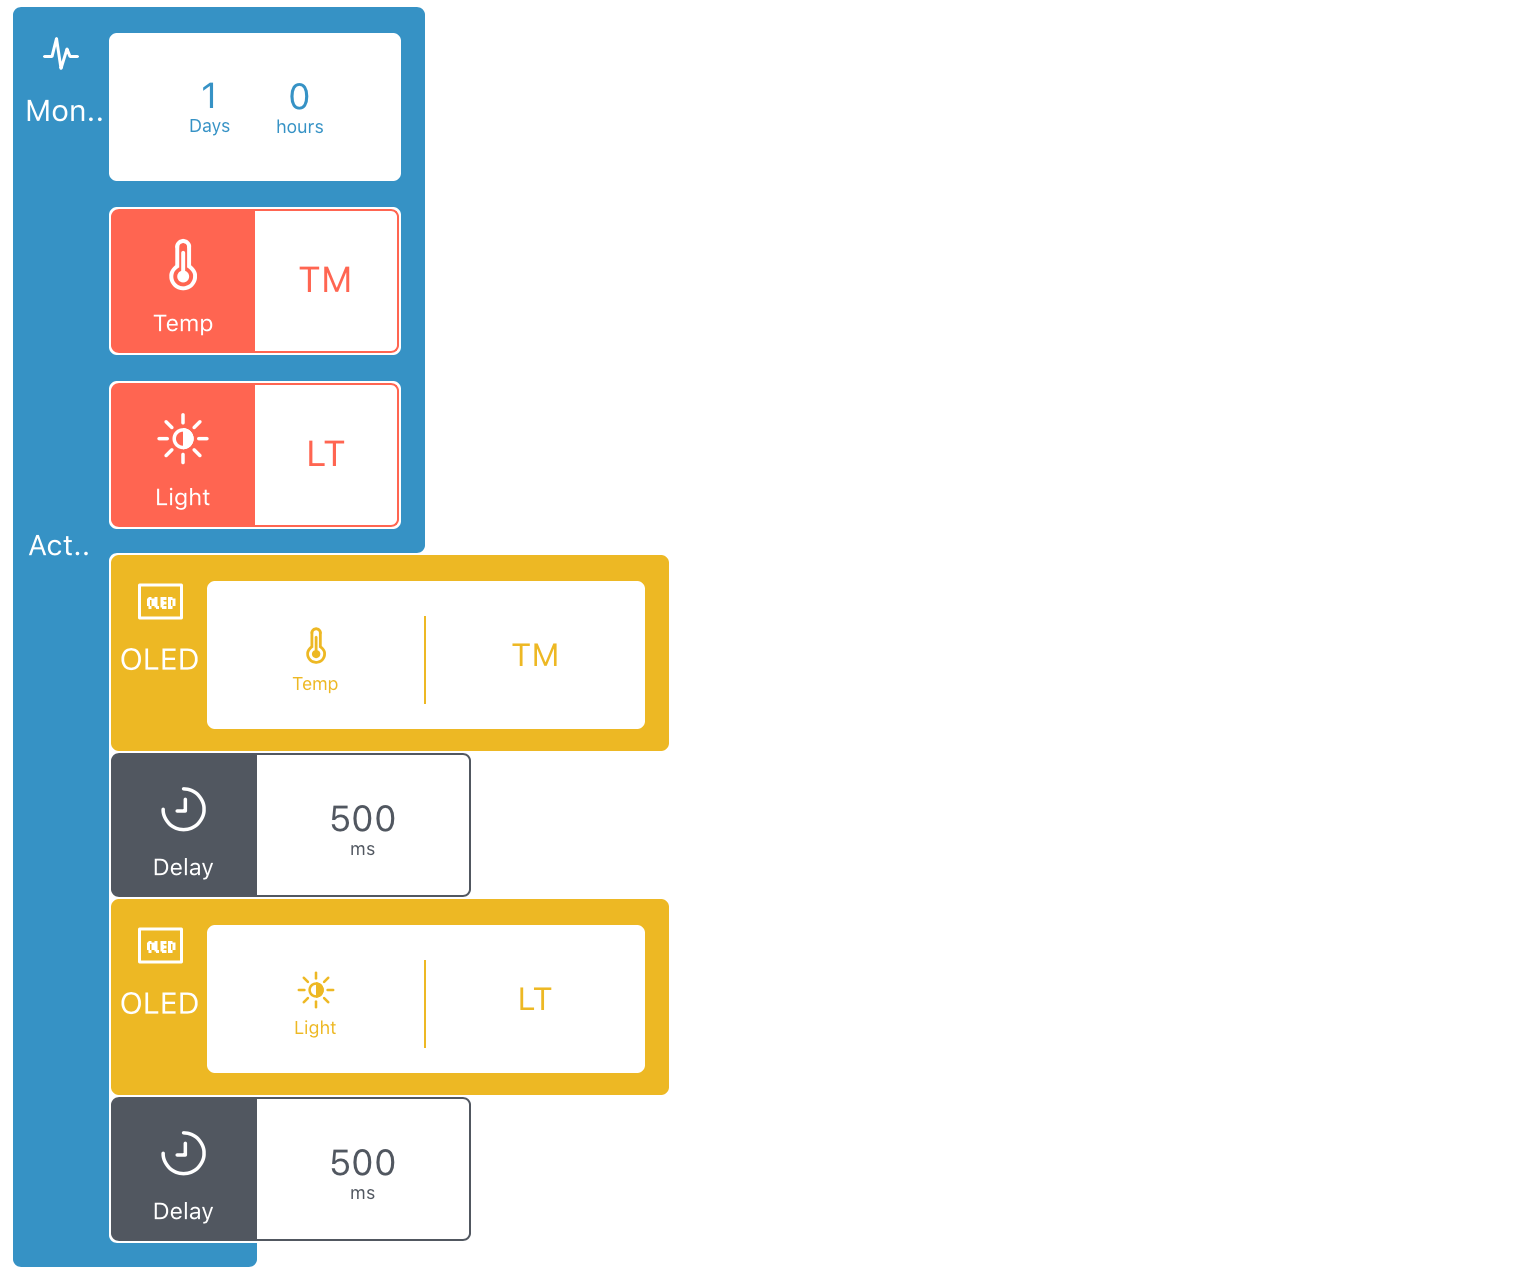
You can use this project to monitor the Temperature and Light sensor for 1 day. While data is also being collected and displayed in the Dashboard section of the app, real-time values are also displayed on Cloudio’s OLED. This project provides an easy way for you to view historical (and real-time) data on your mobile app and real-time data on your board.
Hardware
On-board
Temperature sensor
Light sensor
Design and implementation
Design considerations
Since we want to display the real time data on the OLED while the sensor Monitoring is being carried out, the Action section of the Monitor block is also enabled and houses an OLED block in it.
Running this project
- Upload this project to the board.
- You can view the real-time temperature and light values on Cloudio's OLED screen.
- You can view the sensor data in a graphical dashboard in the Dashboard section of the GraspIO Studio app.
5. IFTTT
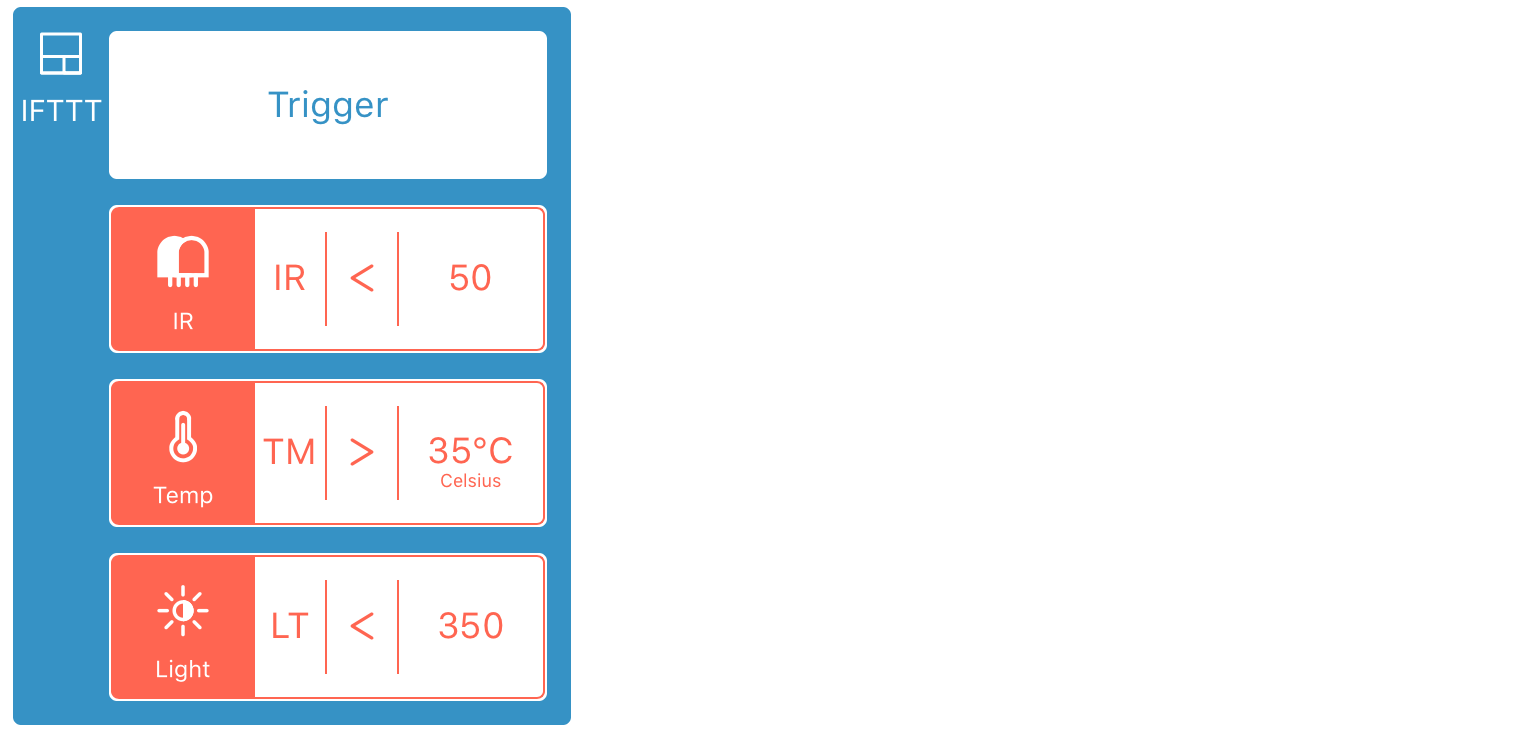
This project configures Cloudio to work as a trigger for IFTTT. Here, three triggers are set up on Cloudio, and either one of them can be used while creating an applet on IFTTT.
A trigger is sent to IFTTT when either of these triggers is fired – i.e. if the IR value drops below 50, or the temperature crosses 35 °C, or when the Light sensor’s reading drops below 350.
Running this project
- Upload the project to the board.
- On IFTTT, create an applet that uses GraspIO as the trigger (If THEN) section of the applet.
- Select one of the triggers available from the Dropdown menu . These will correspond to the triggers set for your board in the IFTTT project in GraspIO Studio.
- Proceed to select from a host of services for the THEN THAT or Action section of the applet.
6. Photo Booth
You can use this project to set up your own photo booth.
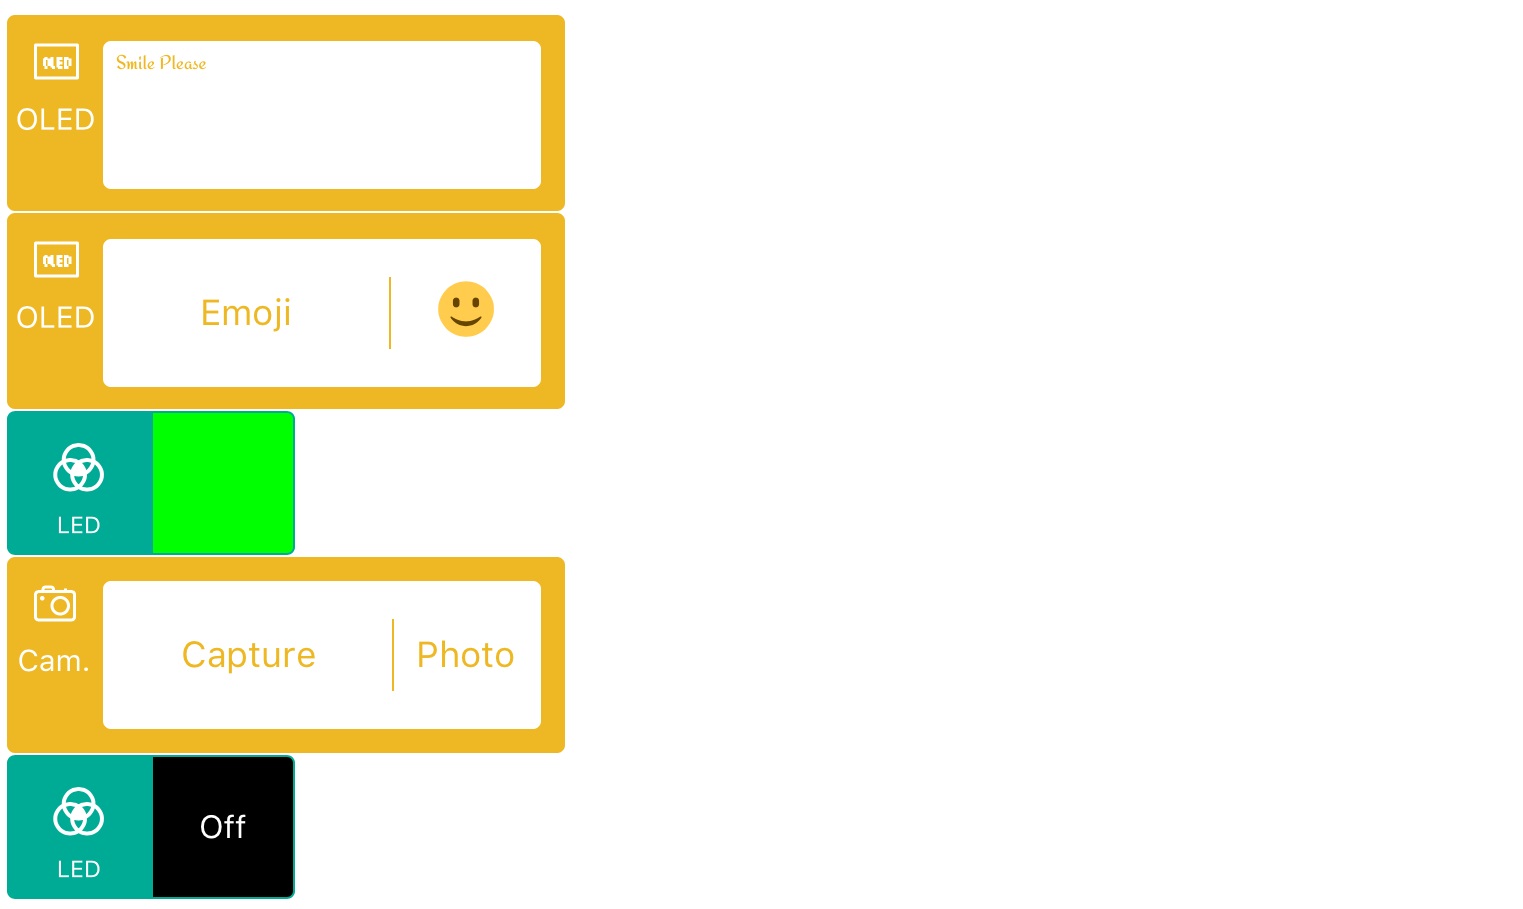
This project begins to run on Cloudio the moment it is uploaded. A message is displayed on its OLED and the RGB OLED turns green. The camera captures a picture when the LED turns green and the captured image is emailed to your registered email ID soon after.
Note: Since Cloudio’s email service needs a 15- minute delay between successive emails, we suggest you upload this code every time you need to take a picture, or better still, you could use a Loop infinity block with a 15 minute or longer delay between consecutive Camera blocks.
Hardware
On-board
OLED screen
RGB LED
External
Camera (Raspberry Pi or USB camera connected to Raspberry Pi). Refer this section to learn how to do this.
Design and implementation
Design considerations
Since this project is designed to run once when the project is uploaded to the board, a Loop block is not used at the start. You can modify this project and however, use a Loop Infinitely block with a desired delay between blocks, and use a Switch press to trigger the photo capture.
Running this project
Connect a camera to Raspberry Pi before you upload this project to your board.
Face the camera and smile when the LED turns green 😊
7. Emoji
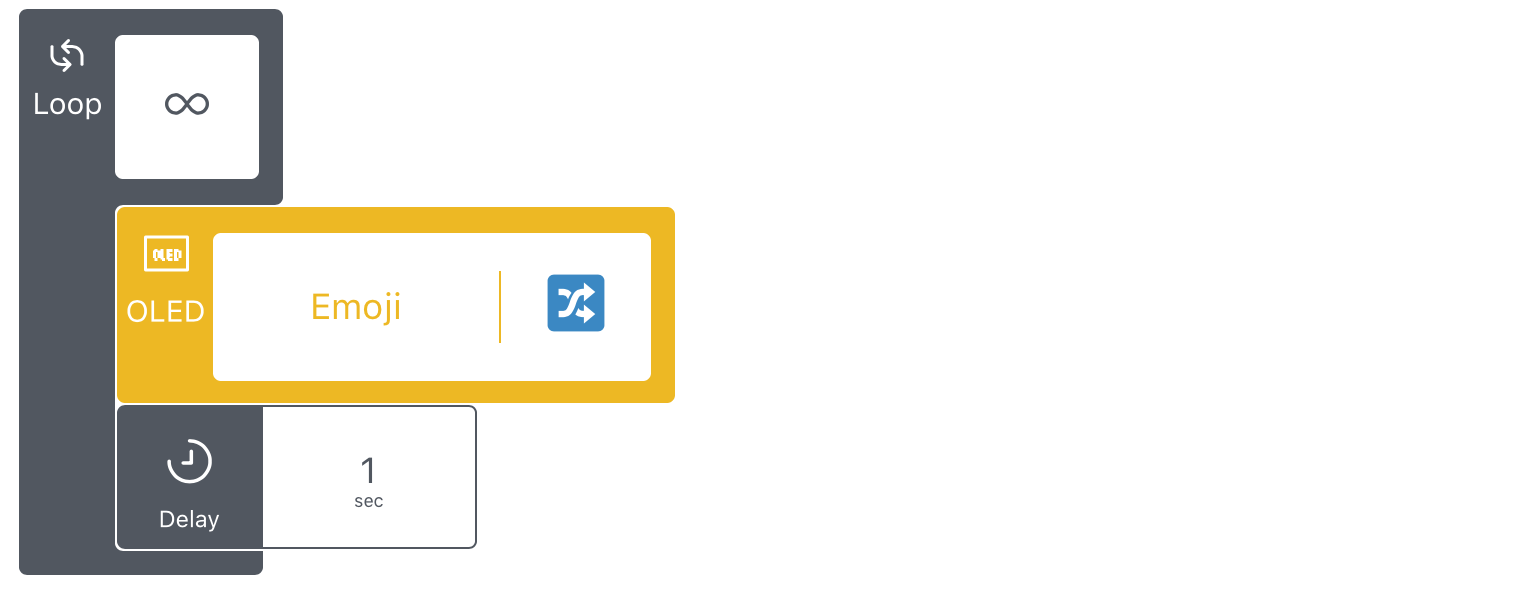
This project continuously displays a shuffled series of emojis on Cloudio’s OLED screen with a delay between each one of them.
Hardware
On-board
OLED screen
External
None
Design and implementation
Design considerations
- Since the project is designed to blink the LEDs continuously from when the project is uploaded till the board is turned off, or another project uploaded, a Loop block is used with the looping parameter Infinity.
- A 1 second delay is included to include a time delay between the emojis displayed on the OLED.
- The Shuffle emoji is used to create a randomised selection of emojis to be displayed.
Running this project
Upload this project to your board and watch the OLED display a series of emojis on it.
8. RGB Disco
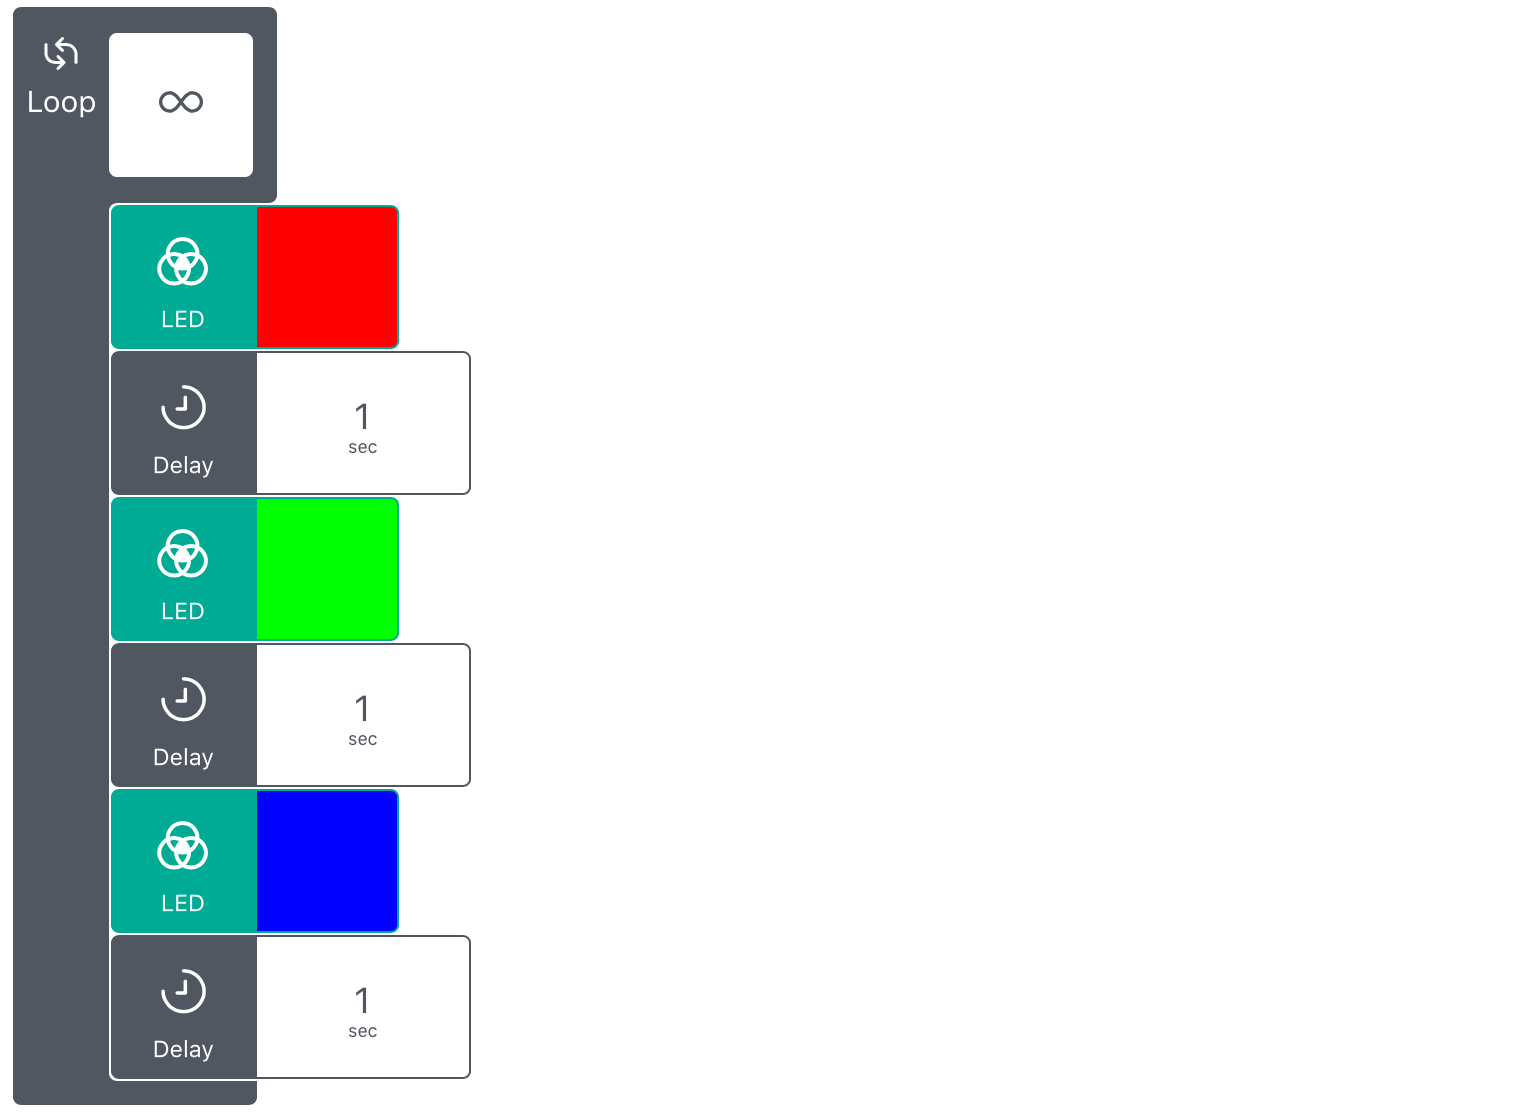
This project continuously displays a series of colors on Cloudio’s RGB LED. The colors can be selected using the Swatch option or by setting R, G, B values to create custom colors.
Hardware
On-board
RGB LED
External
None
Design and implementation
Design considerations
- Since the project is designed to blink the LEDs continuously from when the project is uploaded till the board is turned off, or another project uploaded, a Loop block is used with the looping parameter ∞.
- A Delay block is used between consecutive LED blocks so as to make the color changes discernible and visible.
Running this project
Upload this project to your board and watch the LED display a series of colors.
9. Theft Alert
Hardware
On-board
Buzzer
IR sensor
External
None
Design and implementation
Design considerations
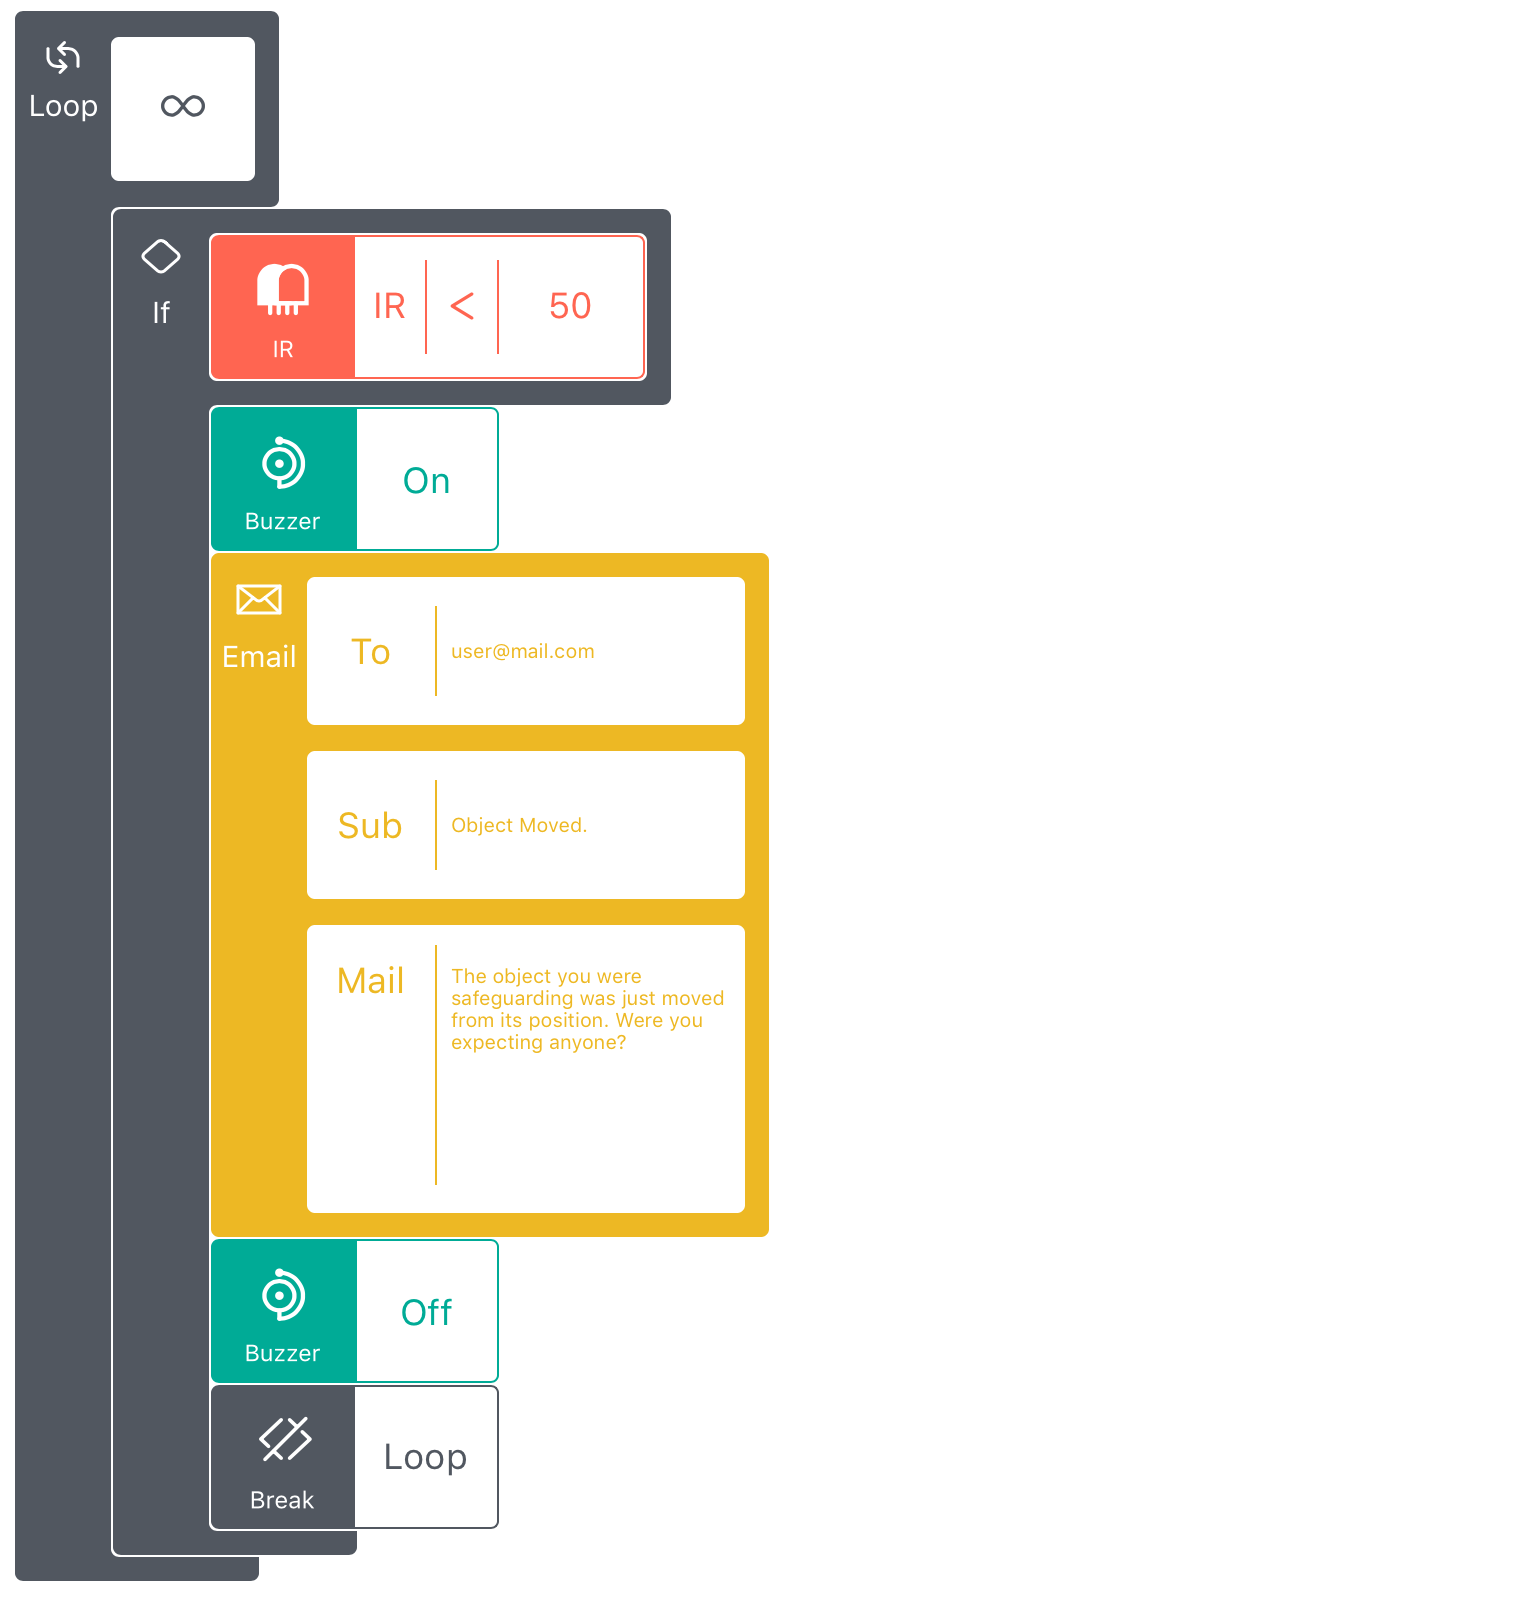
- Since this project needs to run from the time it is uploaded till the object is moved,
- A Loop (∞) block is used to house the blocks
- A Stop block is used when the object being moved is detected so that the code can exit the loop and terminate the project as the object no longer needs to be monitored
- An IR block is used to detect the presence (or absence) of the object as the IR sensor receives a high value when the object is present and a low value in its absence.
- Please be sure to use the Read function before setting the threshold IR value in the If block to detect the object’s presence.
- The Buzzer block is used to turn off the buzzer after the email is sent (as the buzzer will continue to stay on once the condition is met in the If block)
Running this project
- Place the object in front of the IR sensor such that it can detect its presence (or absence).
- Move the object towards and away from the IR sensor while using the Read function in the IR sensor’s control panel. Set the appropriate as the threshold comparison value inside the If block depending on where you want to place the object.
- Place the object at this location.
- Modify the recipient email address and upload this project.
- When this object is moved from its position, you’ll receive an email alert and Cloudio’s buzzer would go off.
10. Voice Control
With this project, you can use your voice to remotely control Cloudio. In this example, two voice commands (referred to as Voice trigger in the GraspIO Studio app) are used.
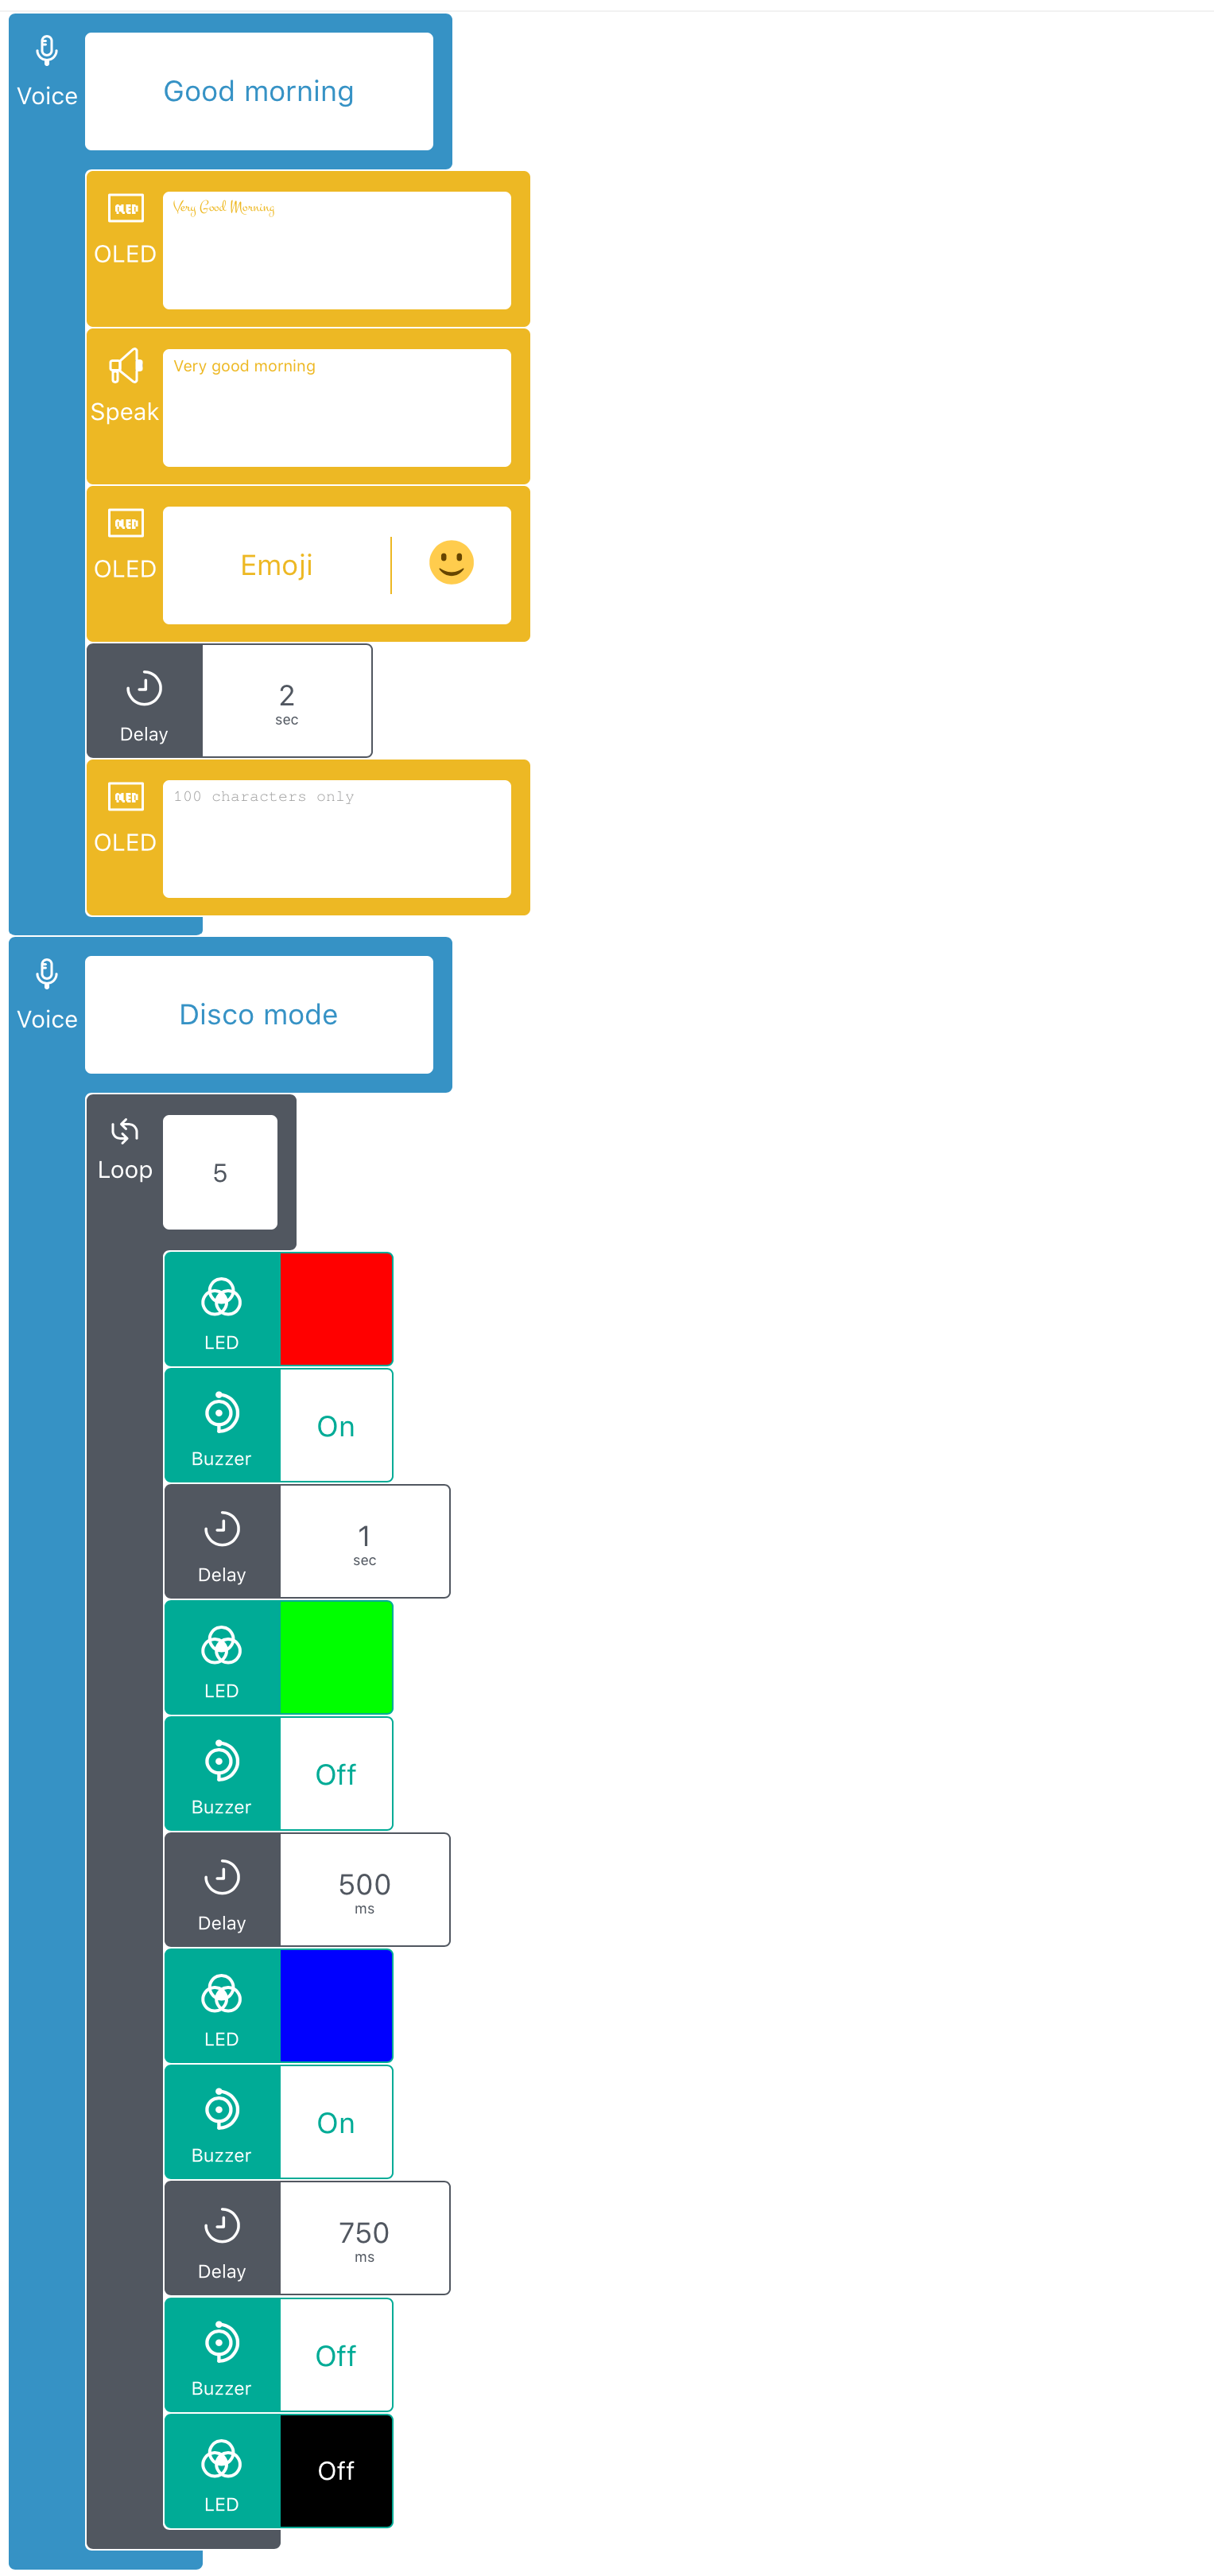
You can use the two voice commands ‘Good morning’ and ‘Disco mode’ on your mobile device to control Cloudio from anywhere, anytime.
In response to the voice command
' Good morning',
Cloudio displays plays the audio 'Very good morning' on the speaker connected to Raspberry Pi besides displaying a message on the OLED followed by an emoji.
Cloudio displays a series of different colors on its RGB LED while beeping the buzzer. This is repeated 5 times.
Hardware
On-board
Buzzer
OLED
LED
External
Speakers (connected to Raspberry Pi)
Design and implementation
Design considerations
- A Delay block is used between consecutibe OLED blocks (in the Good morning section), and LED blocks (in the Disco mode section) to make the text changes discernible.
- An OLED block is used with empty text at the end to clear the OLED display.
- A Loop block with parameter 5 is used to repeat the buzzer beeping and LED flashing 5 times wjen the voice command triggers this action.
Running this project
- To run this project, upload this project to the board, and use your mobile device to provide the voice commands to Cloudio.