About
Before you begin using your Cloudio, you would need to connect it to a Wi-Fi network and add it to your account.
You can use this method to add multiple Cloudio boards to your account.
You can use two methods for this -
- USB Twinkle (Default; needs an additional USB cable),
- Hotspot Twinkle (Alternative; needs a Hotspot to be set up on the mobile device)
You can start this from Accounts -> Hotspot Twinkle
USB Twinkle
This is the default method used to connect Cloudio to your account and a Wi-Fi network. It is a one-time process that uses a USB cable to transfer the Wi-Fi credentials between the mobile device and Cloudio so that Cloudio can connect to (and stay connected to) an external Wi-Fi network.
You'll need:
- A USB cable (to connect the USB port of your mobile device to the USB port on Raspberry Pi)
Note:
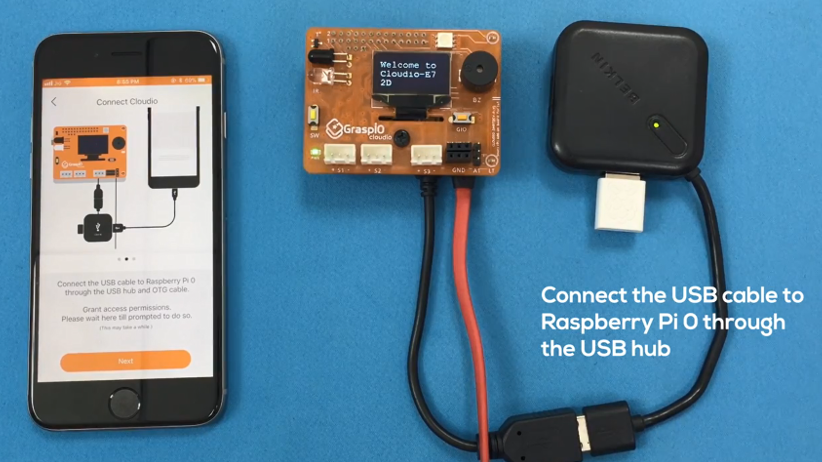
- A USB hub (only if you're using Raspberry Pi Zero, the hub is used for both a Wi-Fi dongle, and a USB cable)
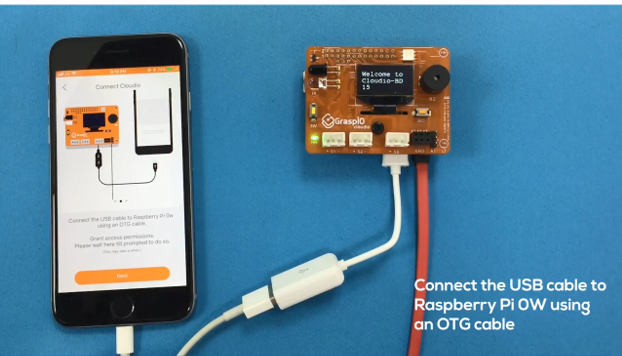
- An OTG cable (only if you're using Raspberry Pi Zero W)
How to - Video
After you have assembled the Cloudio and Raspberry Pi set-up, and powered it, you can proceed to add the board.
How to - Step by step instructions
1.Connect your mobile device and Cloudio using a USB cable as shown below.

2.USB Settings
On iOS
- You will be prompted for permissions when the USB is detected on your device. Please wait till this happens.
- Press Trust to grant access permissions.

On Android
You will be prompted to select the USB connection type when the USB is detected on your device. Please wait till this happens.
- Please set the connection type to Media Device / Transfer Files / Media Transfer / MTP when prompted.
- On certain devices, you may not receive an alert/pop-up for this. You'll need to set the connection type through the notifications section. (This will correspond to the USB detection notification).

Press Next on your app screen.
3.Confirm that you have connected the cable correctly and authorised the connection (iOS) or set the correct connection type (Android) by pressing Confirm on the 'Confirm USB Connection) alert message.
4.Now, on your board, long-press the GIO switch.
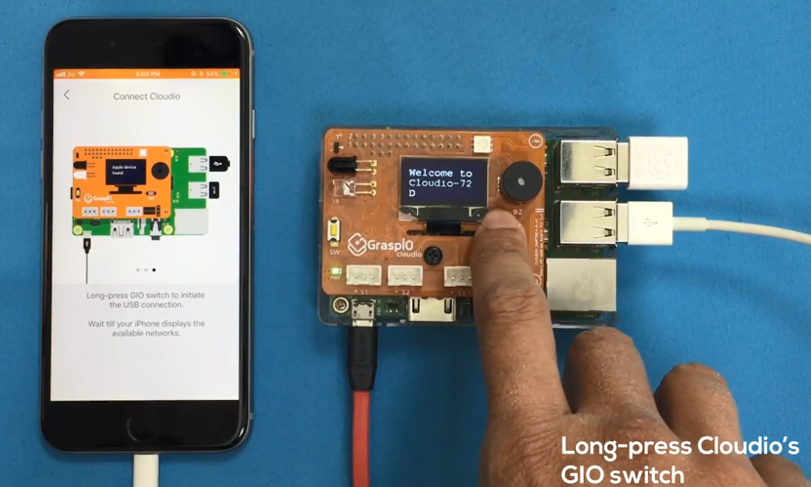
5.The OLED will display a USB logo while Cloudio attempts to connect to your mobile device and will display "Apple device found" or "Android device found" once it has successfully connected to your mobile device.


6.On your app screen, you will receive a list of networks available for Cloudio to connect to.

7.Select the network you want Cloudio to connect to.

Enter its password in the next step and press Next.

8.Wait till Cloudio connects to this network.

9.Once Cloudio has successfully connected to the network, your app screen will display the below.

10.Please proceed to disconnect the USB cable, and name your board.
USB Twinkle Troubleshooting
1. If your app screen displays a USB Connection Error shown below,
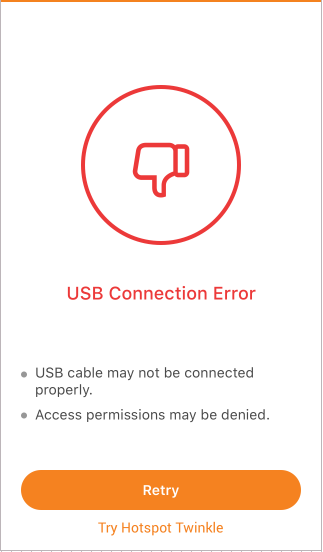
It could be because the
- USB cable may not be correctly connected, or
- Permissions were denied (iOS), or
- Incorrect connection type was set (Android).
To fix this, you'll need to disconnect the USB before you try again.
Additionally, if your Cloudio's OLED displays a list with Hotspot Twinkle displayed and highlighted, please long-press the SW switch to exit the current mode.
You can retry this process by re-connecting the USB and repeating the steps outlined in the instructions.
Alternately, you could try the Hotspot Twinkle method too.
2. If your app screen displays a Connection Error shown below, this indicates that Cloudio could not connect to the external Wi-Fi network.
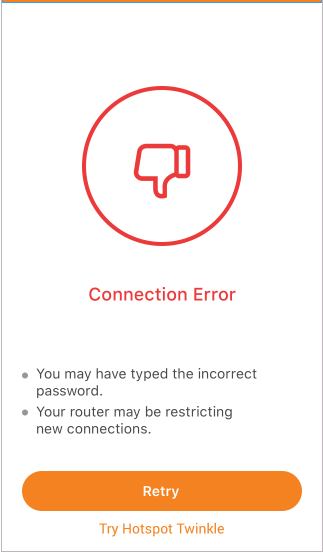
This is most likely due to an incorrect password, or issues arising due to network restrictions, such as your router limiting new connections.
Please check and try again.
You could try either USB Twinkle again or Hotspot Twinkle to do this.